Hi. My name is Cassie Stephens and I cannot stop painting all thing things. Hide your kids, hide your wife, stash your cats and dogs. Me and my paint brushes are comin' for ya.
Y'all might remember some time ago, I created this Tints and Shade sign for my art room. Despite the fact that it looks kinda small in size, this picket fence thingie is actually about 3' across. Asha wanted to interrupt this blog post to share her adorable adorableness with you and provide a bit of scale:
If you've been hanging around this blog for a pinch, you know that I'm currently on a paint-all-the-wooden-thingies-found-at-the-craft-store bender. Just to give you an idea, I've painted letters...
And that's just the wooden stuff I've painted...I've also been on a redecorating bender and I can't seem to stop! I'm currently too lazy to link all of those posts...but just a quick scroll through my blog and you'll find some stuff. Lots of stuff.
Last night, I wasn't ready to go to bed...I'm on a week long Thanksgiving break, after all! It's party time! And, by "party time" I mean PAINT party time. I love late nights of watching movies and painting. Last night I watched Midnight in Paris (how is it that I had not seen that?! So good!) and started working on this bad boy.
I have Roy G. Biv decor coming out the WAH-FREAKIN'-ZOO in my art room (case in point here, here and here) so, as I painted this sign, I knew I didn't want another Roy G. Biv moment. We talk a lot about analogous colors and gradation so I thought that this sign would be perfect. I did toy with the idea of making a monochromatic sign...but that's pretty much what the tints and shade sign is.
This photo is simply here for you to admire this face.
The question I get every time I share something I plan to hang in my room is this: HOW DO YOU GET IT TO STAY ON THE WALL?! Yes, the age old art teacherin' question. Here's my trick: Command Velcro Strips. Get the ones that hold up to 16 lbs. This sign is heavy...and those strips work. I've been using them on everything and I've not had anything fall yet.
I am so enjoying redoing my art room. Having been in the same space for so many years, I just felt like it needed a fresh look. And it's making me happy and excited to work on it. The kids have fun coming in and noticing something new and different. Stay tuned for a BIG reveal on Friday...I'm so stoked about that one!
This will hang in my art room near my tints and shade sign. I'll have to share a photo when it's up!
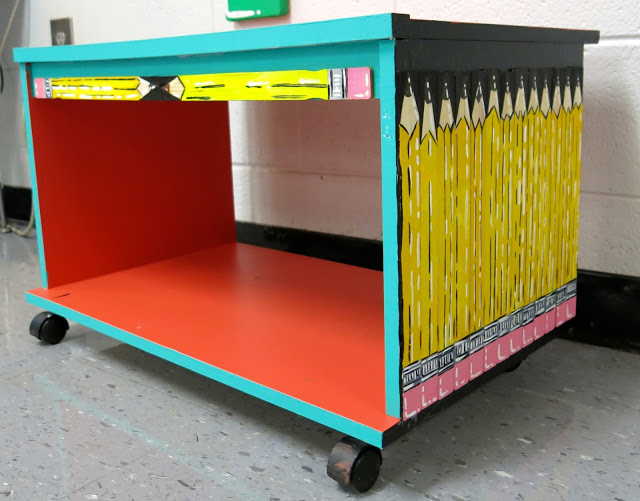
As I've mentioned, I'm slowly "remodeling" my art room. I've been in this space for close to 15 years and I'm just so TIRED of looking at the same decor, store-bought posters, same hot -n- stinky messes. I'm super proud to say that I'm turning my life around (bwhahaha, let's be honest: no.) Okay, what I am doing is trying to get organized for the first time ever. And I feel like it's working and feelin' great BUT organizing is NOT my idea of a party. So, for that reason, I do have to hit the pause button every now and then and do something fun, wild and crazy (according to me, this is my idea of a good time, y'all!). Case in point: This new wall display!
So I've been spray painting and color coding nearly everything in my art room...I think that was fresh on my mind when I ventured into Michael's and spotted these 4" X 12" canvases. I scooped 'em up and immediately started painting them. That was on Monday. By Sunday, I had them up and the wall painted. Now, before y'all tell me how fast I work and question whether nor not I have some sort of time-freezing machine (that would be my super power, honestly!), lemme tell you what I DID NOT do last week: write up my lesson plan for an upcoming evaluation, clean the house, do laundry, fill the 30 glue bottles with black glue for 3rd grade and, oh, countless other things. Y'all wanna know where I find the time? It's by shirking all other adult-type duties. I'm simply a 12 year old in a 42 year old body.
So whilst all y'all were cookin' home cooked meals, we were dining on hummus and crackers last week so I could crank these out. My hubs is a saint. Who really likes hummus, thank goodness.
What in the world was I thinking, spray painting my wall? I blame the paint fumes. I used acrylic paint on the walls...and plan to go over it with a sealer but not sure if it's necessary.
I got labeled bins of art supplies FOR DAYS, y'all! So much happiness. Also, side note, I think I'm gonna extend my tape lines to the paint cans. I started to with the purple...and then found some other shiny object to fool with. You can read about the Color and Line Wall here.
Did I ask my admin if I could paint my wall? Nah, not really. I mean, I might have kinda "asked"...meaning I said something like, "I'm gonna paint my wall, just wanted to let you know." They, of course, were not at all surprised.
The kids sure were! They loved it so I count that as a win. Every time they come in my art room, it's something different. It's fun for us both.
I was asked why I didn't just paint the cans on the wall also...great question. I have no answer other than I really liked those canvases! That size was super cute AND I do love the 3-D element of them popping out of the wall.
Okay...now that this is complete, back to organizing. Insert unenthusiastic "yay" here.
If you follow me on Instagram, then you've seen me share my teacher sample of this Charley Harper-inspired lesson. I filmed the demo a week or more ago...and finally got around to editing it and posting it to my YouTube channel. My plan is to do a series of woodland animal videos inspired by Harper...we'll see how many I manage to complete. I have a tendency to be a pokey lil puppy.
But enough about that, let's get to the lesson video:
Now, like I said, this is the second in a series of Harper-inspired lessons. In case you missed it, the other lesson is a mash-up of van Gogh's Starry Night and Harper. You can find it here. In this lesson, I'm using the same supplies as I did in the raccoon project. Here's the list:
* Faber-Castell Oil Pastels Full disclosure: I work with Faber-Castell frequently and create lessons for them using their supplies. That being said, I do enjoy their oil pastels for a couple of big reasons: they are sturdy. Unlike many other oil pastels I use, they don't break as often. They don't roll! I love that we aren't constantly chasing after them rolling off the tables. AND they are big...some oil pastels are very small and hard to hold for my students. Not to mention, they wear through them quickly. For all those reasons...and the fact that the colors are fabulous...I would definitely recommend these oil pastels. * Brown Watercolor Paint This is for the light wash used on the raccoon. * Texture Rubbing Plates or Burlap Don't have texture plates? Burlap makes for a great rubbing surface! * Construction Paper I love Tru-Ray because the paper doesn't fade and seems stronger than most. * Tempera Paint * Tempera Cakes My new favorite discovery: painting with tempera cakes on construction paper. Like, whut?! The colors stay true and I just love it!
I just had a GREAT couple of questions thrown my way after sharing this lesson on YouTube:
Fabulous questions, don't you think? Here's my response...
May I have a soapbox moment? I'm aware that there are art teachers who do not like guided drawing instruction. I've grown tired of folks speaking of the right and wrong ways to teach art. I'm also super leery of those who speak as though they have all the art teacherin' answers. Here's a secret: they don't. NONE OF US DO. We're all working with our students everyday, listening to them and trying to figure out how to best teach this amazing creative process to them. There are many different ways to teach art...and it's good to dabble in them all. But it's no good to put the methods of other art teachers down. Okay, soapbox moment over and out.
I will keep you posted on how these Harper-inspired projects progress! Until then...
So, I totally thought I shared this video lesson with y'all in a previous post but after some digging, I couldn't find it on my blog! So sorry! I oftentimes post a video to my YouTube channel without adding it here simply because I'm crazy and forgetful. However, if you subscribe, you can stay up to date on my instructional videos (along with some other stuff) that you are more than welcome to use in your art teacherin' world.
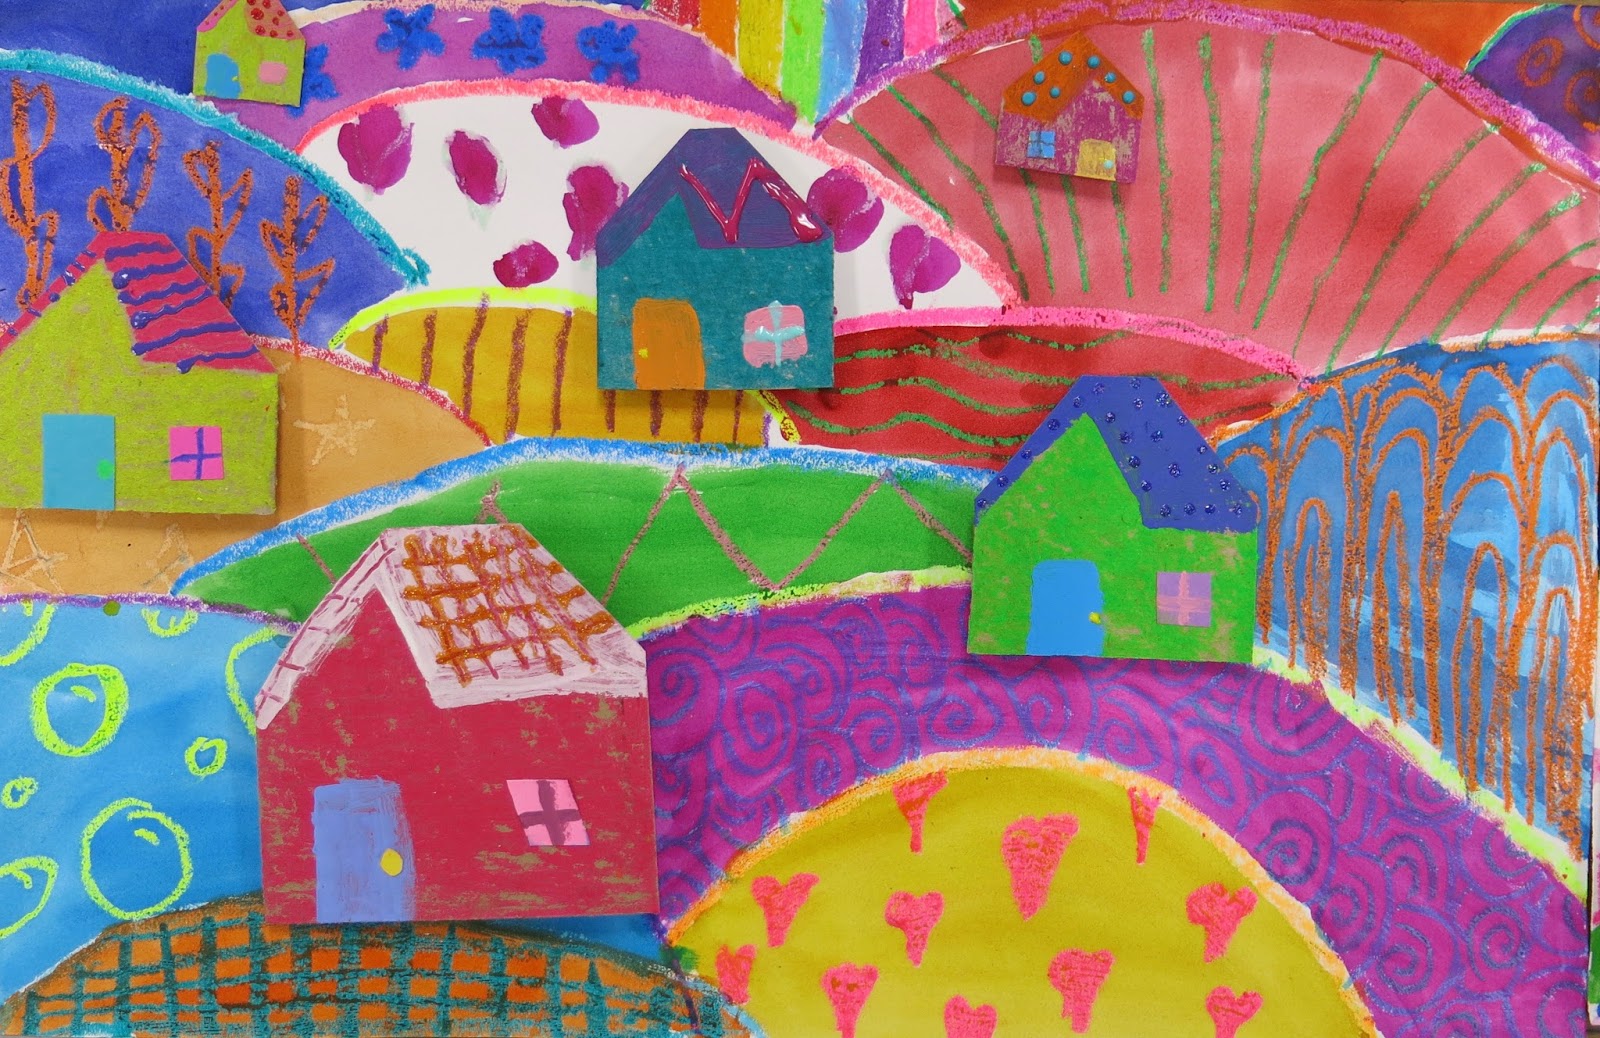
But first, let's talk about these amazing third grade patterned landscapes!
Forgive me but this blog post is gonna be photo heavy...I'm just in love with this project! Every single one turned out so happy, colorful and bright. Here's the video used to teach this lesson:
This did take us about three and a half art classes. While working on this project, my early finishers worked on this lesson which was a great tie-in what with the pattern review:
My students are now obsessed with drawing three dimensional houses!
I'm going to tell you exactly what art supplies we used for this project because, let's be honest, one of the reasons these look so good is because they are so bright and colorful. Kid artists deserve to use quality art supplies just like grown folk. That's easy to say...but not always easy to afford. The supplies I'm about to share are not bananas expensive...but they aren't your bargain basements fare either.
To start, my students used fluorescent oil pastels by Sargent. These are my favorite to use when we are creating a watercolor resist because of how bold and bright they shine through the paint.
They run about $7 a pop...and I purchase enough for two kids to share. You can find them in just about any art supply catalog. We don't use these all the time...like I said, we love them for resist. I've shared these many times before on my blog, I just love them!
I love both liquid and watercolor paint. However, I wanted the kids to use pan watercolor paint for this project because I'm still learning the liquid watercolor paint ropes. How much water do I add to dilute? It looks black in the cup and that confuses the kids...you get the idea. I'm working on my issues with liquid. When it comes to pan watercolor tho, not all are created equal. I LOVE Crayola's Mixing Colors:
Okay...here's the deal. I didn't always love Crayola's watercolor paint until I discovered theses guys. Here's the deal: DO NOT BUY THIS SET unless you don't have any watercolor trays. Instead, by the refill colors in the set. Here's what I have: I got rid of the black, white and brown from my watercolor trays. Now I have refill pans that I simply pop out and replace of the following Crayola watercolors: red, red-orange, orange, yellow, green, turquoise, blue, blue violet, purple and magenta. I place them in the paint pan in that order.
These photos have not been altered...that's truly how bright the watercolor and oil pastels are! Now you see why I love 'em so!
For our houses, we used cereal boxes. I sent out an email at the start of the year asking for cereal boxes simply because we need that cardboard for projects like this!
The kids used "naked" oil pastels to do a rubbing on the house before either collaging the doors and windows on or painting them. That was a hot mess of a day, not gonna lie. We had paint, cardboard, paper, glue and puffy paint all on the tables.
As far as puffy paint goes, I like Tulip brand that can be purchased in most craft stores. It's expensive at about $3 a bottle...but I LIVE for puffy paint and so do my kids!
Once the houses were dry and the background was complete, the assembly was ready to happen.
I am the proud owner of a TON of foam core from matting and framing artwork. I simply chopped that into bits for our pop out foam.
To really get those houses in the foreground to stand out, the kids made sure to double up the foam core. One piece was used for those in the middle ground and either one or none for the background.
With these complete, my students are moving on...we are now onto creating self portraits for our winter art show!
I decided to give myself a wee break and use a lesson from last year for our selfies...it was a huge hit so I'm excited to give it another go:
We'll be using my favorite chalk brand for this project: Faber-Castell!
Alright, I did say this post was going to be photo-heavy, right?
But, can you blame me?! Each one is just so happy!
I definitely will be doing this project again. I can't think of anything I'd change about it.
Even when some friends went wild with the puffy paint, it worked!
You'll have to keep me posted if you give this project a try in your art room. Please be sure and tag me. Not only would I love to see but it also helps others find the details on the lesson.
Just a peak at the foam core. I stressed that none should be visible from the front of the house.