Well hello there! My Royal First Graders and I are thrilled to have you drop by and visit. These sweet kiddos have been working super hard on their 9" X 12" selfies for our upcoming Artome Art Show!
If this project looks familiar, that's because I've shared it before on this here blog! You can find additional information about this project here and here.
I realize that I've never shared a video of this process which might make it easier to understand. It's a project with plenty of steps...which is easy for me to break down in my 30 minute class time. Because I see my younger students for 30 minutes, I don't often make instructional videos for them. However, I did create one just for you! Here you go:
I also got a lot of questions about this project on Instagram, namely how do I teach color mixing for skin tones. So I thought I'd film myself explaining that to my students. I also wrote a blog post about that process which you can find here.
For our Artome art show, which is a fundraiser, I always love to have the kids create self-portraits. Every parent LOVES a self-portrait! They sell really well. This fall, when I had the art show looming, I was really sweating coming up with 5 new selfie lessons. It was then that my husband said, "were the ones from last year successful? Then just do them again!" I don't know why I always feel the need to reinvent the wheel. The self portrait lessons we did last year were all so well received. So, I'm doin' 'em all again. Only the kindergarten lesson is getting a reboot. Here's what my third grade is creating:
So, just a side note: I'm SUPER DUPER annoyed today. The last half dozen videos I've shared on my YouTube channel, including the one below, have been flagged as "inappropriate". I'm talking my teaching videos, my art room decor videos, everything. As soon as I post ANYTHING, it's getting flagged and removed from view. I feel MISERABLE about this...and won't be sharing any videos until this gets resolved. It's a waste of my time to post something simply to have it removed. It's obvious it is someone who is a subscriber and just simply removing my videos to be a butthead. Guess what? You've succeeded at being an EPIC butthead. Congratu-butthead-lations. On to my completely inappropriate video! Brace yourselves, it totally deserves to be blocked (ha!):
Having found this little cottage at the thrift, I immediately knew I wanted to haunted house-ify it. The beauty of Celluclay is that you can transform just about anything super easily. I've actually got a slight collection of randoms that I've been gathering from the thrift to transform. For that reason, I'm no longer permitting myself to go into the thrift store for a bit #hoardermuch.
In the video, you'll see that the house began as simple as a wooden box. Not much of a haunt. I decoded to spook-ify it by adding turrets, a porch, columns and windows a plenty.
Having Celluclay'ed the daylights outta the thing, I did have to dry it in front of a fan for a day. Even still, I did notice that the areas which didn't dry completely started to mold. No bueno. But when I painted over the entire surface with black acrylic, that seems to solve the mold problem.
Dry brush is my fave way to paint. I love the antiqued look it adds to my creations.
Just a view from the side...and the back. I really wanted to find one of those flickering light bulbs but, alas, I could not. So a wee bulb with some red paint applied would have to do.
I really wanted to add wee lines for the wooden boards on the house, shingles to the roof and that sort of thing...but since Halloween is TODAY and I was painting this LAST NIGHT, I just ran outta time. Next year! Maybe. Okay, probably not, who am I even kidding.
Y'all don't even know how sad I am that I have to take all of this fun stuff down. My only comfort is that I get to replace it with CHRISTMAS!
As I've mentioned, I'm slowly "remodeling" my art room. I've been in this space for close to 15 years and I'm just so TIRED of looking at the same decor, store-bought posters, same hot -n- stinky messes. I'm super proud to say that I'm turning my life around (bwhahaha, let's be honest: no.) Okay, what I am doing is trying to get organized for the first time ever. And I feel like it's working and feelin' great BUT organizing is NOT my idea of a party. So, for that reason, I do have to hit the pause button every now and then and do something fun, wild and crazy (according to me, this is my idea of a good time, y'all!). Case in point: This new wall display!
So I've been spray painting and color coding nearly everything in my art room...I think that was fresh on my mind when I ventured into Michael's and spotted these 4" X 12" canvases. I scooped 'em up and immediately started painting them. That was on Monday. By Sunday, I had them up and the wall painted. Now, before y'all tell me how fast I work and question whether nor not I have some sort of time-freezing machine (that would be my super power, honestly!), lemme tell you what I DID NOT do last week: write up my lesson plan for an upcoming evaluation, clean the house, do laundry, fill the 30 glue bottles with black glue for 3rd grade and, oh, countless other things. Y'all wanna know where I find the time? It's by shirking all other adult-type duties. I'm simply a 12 year old in a 42 year old body.
So whilst all y'all were cookin' home cooked meals, we were dining on hummus and crackers last week so I could crank these out. My hubs is a saint. Who really likes hummus, thank goodness.
What in the world was I thinking, spray painting my wall? I blame the paint fumes. I used acrylic paint on the walls...and plan to go over it with a sealer but not sure if it's necessary.
I got labeled bins of art supplies FOR DAYS, y'all! So much happiness. Also, side note, I think I'm gonna extend my tape lines to the paint cans. I started to with the purple...and then found some other shiny object to fool with. You can read about the Color and Line Wall here.
Did I ask my admin if I could paint my wall? Nah, not really. I mean, I might have kinda "asked"...meaning I said something like, "I'm gonna paint my wall, just wanted to let you know." They, of course, were not at all surprised.
The kids sure were! They loved it so I count that as a win. Every time they come in my art room, it's something different. It's fun for us both.
I was asked why I didn't just paint the cans on the wall also...great question. I have no answer other than I really liked those canvases! That size was super cute AND I do love the 3-D element of them popping out of the wall.
Okay...now that this is complete, back to organizing. Insert unenthusiastic "yay" here.
Hey there! A couple of weeks ago, I mentioned that my third and fourth grade kids would be Sketching through Art History in their sketchbooks this year. I go into more detail on this idea, the sketchbooks and the process of making this idea work here. I'll try to give you a quick look-see here: When my students enter the room, they pass a bin of sketchbooks, taking out theirs and placing it on the floor in front of them. Kind of like this:
Once they've watched a Hot Minute of History video, they then watch another one minute drawing prompt video. Here is the one I created for Stonehenge:
The kids now know the drill: during their 5-7 minutes of sketch time, their is no talking. I want them to be mindful, engaged and drawing the entire time. When the timer goes off, they often groan and ask for more time...which is music to my ears. I often splurge and give them a few more minutes. This week, I asked students to share their drawings with their neighbor. I put two minutes on the clock and asked them to spend one minute being a good listener and another being a good explainer. I think they really enjoyed sharing their ideas with their friends.
I have been putting our art history nuggets into song form to the tune of We Will Rock You! It's been so fun, I actually am a miserable poet but I do love writing these. Here is the PDF if you'd like a copy.
And here is the one I wrote for Cave Art. Next up: Ancient Egypt! You can stay up to date on these by subscribing here.
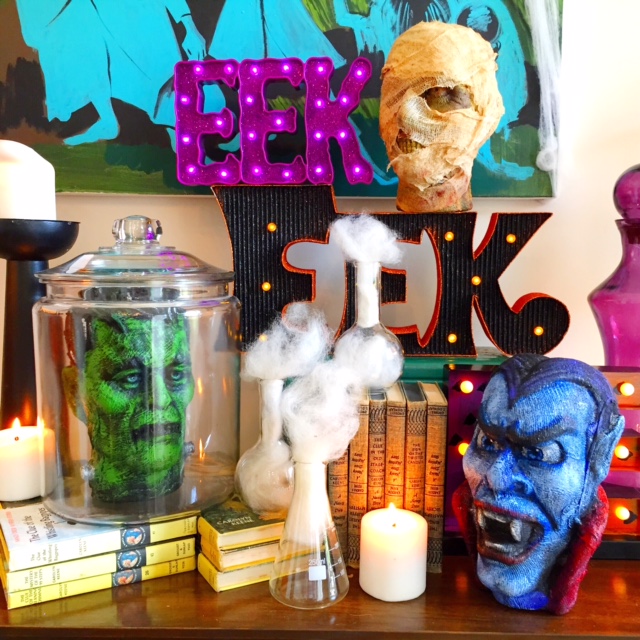
First of all, can I just tell you how SAD I am that next Tuesday is Halloween?! I still have two more Halloween DIY's in the queue to share with y'all! If you are looking for some spooky crafts this weekend, look no further...I've got you covered! I'll be sharing a dozen or more in this here blog post. I kinda went bananas with the Halloween crafts this year...but it truly is my most favorite thing ever. I'm gonna be super sad to pack all of this up next week. Tho, let's be honest, it will probably stay up a pinch beyond Halloween. I mean, there is Day of the Dead to consider, after all!
But, on with the craftin' of these Monster Mash Heads!
Let's talk supplies: * Styro Monster Heads. I picked mine up here last year after Halloween for next to nuthin. They still have them this year too!
* Sta-Flo Liquid Starch. This stuff is my jam, y'all. I have used it for that super fabulous chalk project and for a MILLION Halloweenie crafts. I've been asked where to get it...I found it on the cheap here. * Cheesecloth. You can find this both at the craft stores and at the grocery. It's probably the cheapest online. * Acrylic Paint. Durable and leaves a shine...I love the stuff. Even the cheap stuff!
Now I did mention Halloween crafts...I thought I crafted hard for the spooky holidays last year. Well, this year, really went all out. Lemme share with y'all what I created:
Although these eyeballs were definitely the most easy to crank out.
If you need a fun, fast and easy craft, check this one out!
Okay, the hubs takes total credit for how The Mummy came to be. I think the original intention of that styrofoam head is for it to be a zombie...but zombies weren't in my vintage movie line up. So hubs suggested wrapping him in strips of cheesecloth and YES! Look! He's so stinkin' spooky!
Who's your dentist, bro? You might wanna ask for a refund.
Frank is quite the looker, don't you think? Bride didn't know what she had, silly girl!
Best part about having these in my tree was that I didn't have to hang them or do anything...just place them on the branches!
I love using the cheesecloth because I love the effect I can get with the textured surface. Painting the entire thing black and then going over it with a dry brush is my new favorite thing on the planet. It's so freeing for an uptight and particular artist like me.
Oh, what's that? You need more Halloween crafts? Here you go!
Check out my Top Ten Halloween Crafts from last year, right here!